If you haven't yet heard the buzz that's been building since Drupalcon DC in March about the fabulous Migrate and Table Wizard modules, written by the smarties at Cyrve, then here are a few questions for you:
- Does the phrase "data migration" conjure up images of being repeatedly stabbed in the knee with a rusty fork? (which would of course be a far more enjoyable experience!)
- Have you spent countless hours sifting through record after record of your clients' legacy data, pining for an easy way to catalog it all so you (and they!) can both tell what's really important to pull over?
- Do you lose years off of your life every time you attempt a bulk migration, hoping for the best that there are no horrific bugs that need to be sorted out afterwards that you didn't catch in testing?
- Have you had it up to here with having to go and find separate modules, each with totally different interfaces and levels of bugginess, for importing nodes, taxonomy, users, and so on?
If you answered yes to any of these questions, then the Migrate and Table Wizard modules are for you! Read on to learn how they work and try a "hands on" example.
(Note: This article is written against the current -dev releases of both Table Wizard and Migrate, which will eventually become Migrate 6.x-1.0 and Table Wizard 6.x-1.2. Final screen shots may vary.)
Overview: Importing data into Drupal in three easy steps!
Yes, really! Only three of them! Are you salivating all over yourself, yet? ;)
Step 1: Get your stuff into a MySQL or PostgreSQL* database.
The first step is getting whatever external data you have into MySQL or PostgreSQL database tables (or hopefully, just about any database type when these modules are ported to Drupal 7). A quick web search for "x to SQL converter" or similar will reveal lots of tools to assist with this step. And in fact, Table Wizard module itself comes with an optional module called "Table Wizard Import Delimited Files" which can handle things like comma-separated values (CSV) files for you.
These incoming database tables can either be added Drupal's database (mind your table prefixes if you go this route -- 'users' is a popular table name! ;)), or in an external database by adjusting your $db_url in settings.php as described in the external tables section of the Table Wizard documentation.
There are a few important caveats here:
- Due to limitations in the pre-Drupal 7 database abstraction layer, the destination database type must be the same as Drupal's. In other words, if your Drupal site is installed in a MySQL database, your stuff needs to be imported into a MySQL database, too.
- For more advanced types of migrations, such as importing hierarchical data (we'll talk about this in the next article), there is currently a limitation in Table Wizard module where these database tables must be within Drupal's database. This is being discussed in Drupal.org issue #610128: Can't add external and internal tables' columns to the same view.
- PostgreSQL support may be iffy. It needs testing, and is a blocker to a 1.0 release of Migrate module. If you are PostgreSQL-inclined, please help out at Drupal.org issue #392398: PostgreSQL support
Step 2: Use Table Wizard module to expose database tables as Views.
Once the data is in database tables, Table Wizard module comes in. It Views-enables (exposes to Views module) any table's data. This carries with it a number of immediately awesome side-effects:
- You can do anything to this incoming data that you can do to a view: sort it, filter it, add or remove fields, alter the fields' output...
- You can form relationships between two different tables and create Views which combine the results from multiple data sets.
- You can even use Table Wizard as a general tool for Views-enabling your own custom modules' data!
But more than just providing this views awesomeness, Table Wizard module also provides a methodology and process around doing data imports, through its incredibly helpful "analyze" screen. In addition to displaying a wide variety of incredibly helpful information about your table's data, including recommendations on data types and field lengths, it also provides a "Comments" text area for each column. Through the use of comments, you as the site builder can work directly with your client (who knows their data best) to collaborate on the site's migration strategy: mark unimportant columns or tables as "Ignored," note the important data transformation tasks that need to occur during the import on certain columns, document any weird tweakiness that happened during practice runs, and so on. This collaborative workflow provides a fully transparent view into the site's migration process, which does wonders for the comfort level of both parties during exceptionally large imports.
Step 3: Use Migrate module to map a View of external data to native Drupal data.
Next, we turn to Migrate module. In Migrate module, you can define "content sets", which are essentially mappings between fields coming from Views, and fields attached to internal Drupal data types. For example, you can map the "article_title" field in an external "articles" table to the "Node: Title" field of an "Article" content type in Drupal. Migrate natively supports importing nodes, taxonomy terms, users, comments, profile data, and even has some support for contributed modules such as FileField and Content Profile. If these data types aren't enough for you, there are also hooks for defining your own.
Migrate module also has a variety of options for testing the imports to ensure they're solid before you pull the trigger "for real," and even has support for Drush integration, so you can perform massive imports from the command line instead of the browser. There are also hooks for performing actions or otherwise massaging the incoming data before, after, and during a migration. Sweet!
Ok, enough overview. Let's see 'em in action!
Migrate and Table Wizard hands-on example
Here is a simple hands-on example to show how to import the hypothetical products from a legacy database into native Drupal nodes. Through the process, you'll be exposed to most of the Migrate and Table Wizard module administrative screens.
Preliminary set up
Before you can go through the example, you first need to do some basic steps.
- Download the following modules and put them in your Drupal 6 site's sites/all/modules directory:
- Table Wizard
- Migrate
- Schema
- Views
- CCK (to play along with the example)
- Enable the modules from Administer >> Site building >> Modules (admin/build/modules):
- "CCK" package: Content, Content Copy, Number, Text
- "Database" package: Schema, Table Wizard
- "Development" package: Migrate
- "Views" package: Views, Views UI
- Now, we need to import our legacy content into our database. Download legacy_products.sql.txt and import it into your Drupal site's database using a tool like PHPMyAdmin. (Note: This file is a dump from MySQL; it might need some massaging for PostgreSQL.)
- Finally, we must create a content type to hold the incoming data. Download cck_product.txt, then go to Administer >> Content management >> Content types >> Import (admin/content/types/import). Copy and paste the contents of the file and click "Import" to create a "Product" content type in your Drupal site to hold the incoming data.
Preparing data for import with Table Wizard module
With our legacy data safely imported into our Drupal database, we can now begin the second step: using Table Wizard to expose a view of our incoming data.
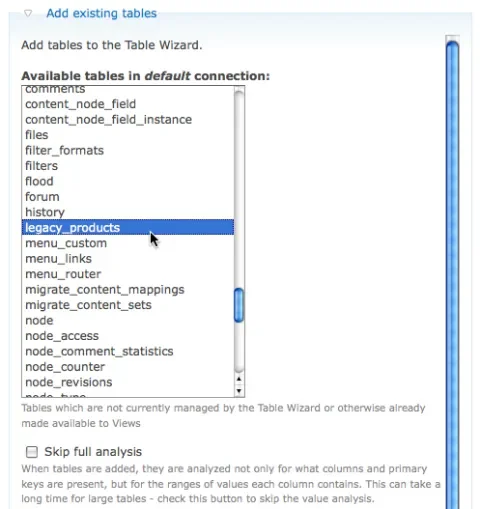
- Head to Administer >> Content management >> Table wizard (admin/content/tw) and expand the "Add tables" fieldset.
-
Select the "legacy_products" table from the list. The rest of the settings can be left at their defaults. Click the "Add tables" button.
A list of possible tables that can be made Views-enabled by Table Wizard module.
-
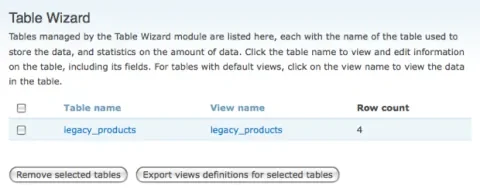
After a brief progress bar while the table's contents are analyzed, you arrive back at the main Table Wizard screen. Here, you'll find two main columns: "Table name", which allows you to configure options around the table's structure, and "View name", which provides a listing of the table's contents as a view. You'll also see a count of the number of records within the table.
Table Wizard's interface for added tables.
-
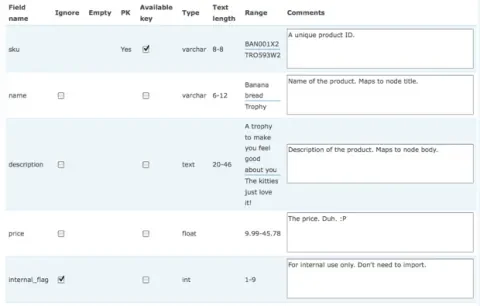
Begin by clicking "legacy_products" under the "Table name" column to bring up the "Analysis" screen, which provides overview information about the data coming in.
Table Wizard's table analysis screen.In our sample data, there is one extraneous column that we don't care about: internal_flag. This is some kind of holdover from the legacy data, but it's not something we need to import into Drupal. Check its Ignore flag, and submit the form. Now the field won't be visible in the generated view, and we won't see it later when we go to do our data migration.
-
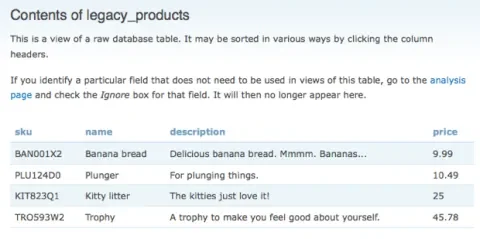
Now, either by clicking "View table contents" or returning back to the main Table Wizard screen and clicking on the "legacy_products" link under the "View name" column, you can see the actual contents of the table, minus the "internal_flag" column we ignored in the previous step. This is just a straight-up Views module view, and can be edited just as any normal view you create.
The View generated by Table Wizard module of legacy product data.
Importing data into Drupal with Migrate module
Once your view is set up, it's time to migrate that data! This section will discuss setting up a "content set" in Migrate module to map the view to internal Drupal data structures, and how to actually pull the trigger on the migration itself.
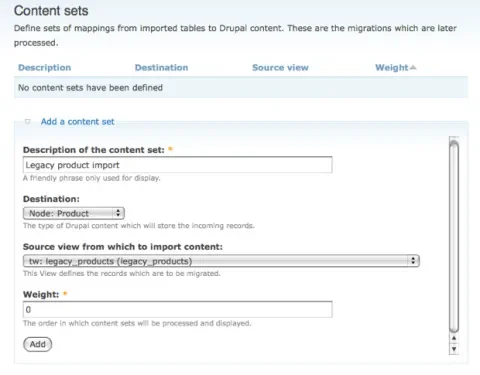
- Head over to Administer >> Content management >> Migrate >> Content sets (admin/content/migrate/content_sets). Here, you can see a list of native Drupal types: node, comment, taxonomy, user, etc. as well as source views from which to import content. Source views that start with "tw" come from Table Wizard module. Fill in the following settings to map our "legacy_products" view to our "Product" content type: Description of the content set Legacy product import Destination Node: Product Source view from which to import content tw: legacy_products (legacy_products)
Defining a content set in Migrate module.
-
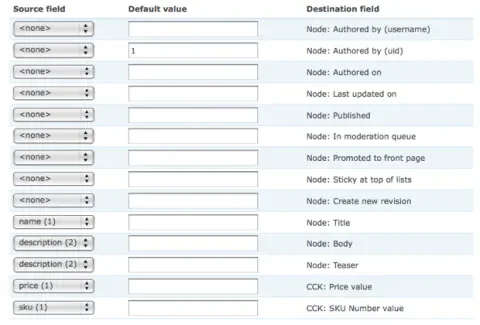
If you scroll down on the next screen, you'll see a series of fields for mapping incoming data from the "Source field" (coming from the view) to a "Destination field" within Drupal. There are also text fields for adding a default value if one is not specified. We can use this to make all of our imported content show up as authored by the super user account (user 1), as opposed to anonymous.
Set up the following mappings. The rest can be left at their default values. Source field Default value Destination field <none> 1 Node: Authored by (uid) name Node: Title description Node: Body description Node: Teaser price CCK: Price value sku CCK: SKU Number value
Setting up the field mapping for the incoming product data
-
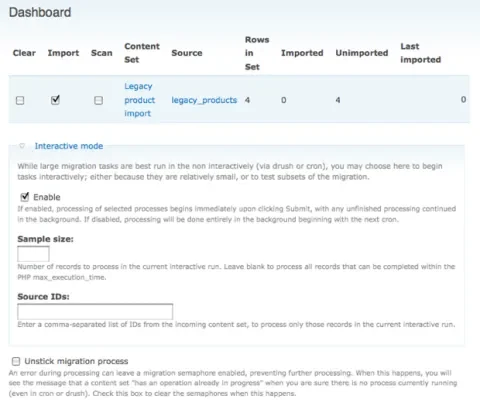
Once the mapping is done to your liking, save the form and head to Administer >> Content management >> Migrate >> Dashboard (admin/content/migrate/dashboard). Here, you can initiate the migration process, and also track statistics about the migration such as its progress (how many items imported vs. left unimported, and when the last import attempt was made).
Migrate module's content import dashboard Check the "Import" checkbox, and click Submit. After a brief pause, you should receive notice that 4 items were imported, and the number of rows in the "Unimported" column should now read 0:
Post-migration results shown in the Migrate dashboard.
-
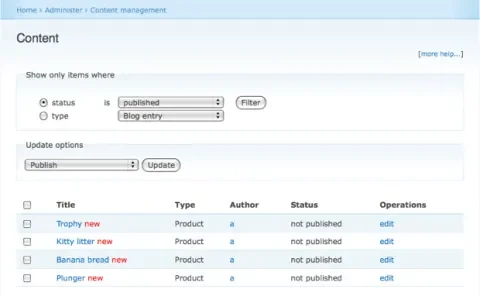
Now, it's time to view the fruits of our labour! Head to Administer >> Content management >> Content (admin/content/node). You should now see four freshly-imported product nodes! Go ahead and click on them to spot-check the results.
Content administration screen showing newly imported content.
You may have noticed one important detail about this migration: the imported nodes are all set to unpublished, so no non-administrative users can see them! This is actually a good thing; you don't want content that was accidentally imported incorrectly to immediately appear to your site's end-users, accidentally get indexed by search engines, etc.
- Once we've checked to make sure that our content imported properly, it's time to do the migration "for real." Return to the Migration module dashboard at Administer >> Content management >> Migrate >> Dashboard (admin/content/migrate/dashboard). By checking the "Clear" button and clicking "Submit," Migrate module will delete all of the records it previously imported, taking us back to a clean slate where we can start again. This is an awesome feature, as it gives you complete freedom to test and re-test (and re-test again....) any migration jobs.
- Let's make one last tweak to our content set to set the default published state of incoming nodes. Head back to Administer >> Content management >> Migrate >> Content sets (admin/content/migrate/content_sets) and click on "Legacy product import" to return to the field mapping screen. Leave the values as-is, but next to "Node: Published" enter a "Default value" of 1.
- Time for the final migration! Return to the Migration module dashboard at Administer >> Content management >> Migrate >> Dashboard (admin/content/migrate/dashboard) and once again check "Import" and click "Submit." Then head back to Administer >> Content management >> Content (admin/content/node) to view the results. Voila! Freshly imported product nodes, visible to our site's end users.
A sample node from the incoming content.
Summary
This article introduced the Migrate and Table Wizard modules, and provided an overview of the content import method they utilize: first getting data into MySQL/PostgreSQL tables, then exposing those database tables to Views, and finally mapping the views to internal Drupal data types and triggering the migration process. We then walked through an example import of legacy product data into Drupal nodes with attached CCK fields.
Most "real world" data import jobs require a bit more tweaking, and a follow-up article will explain how to import more advanced data sets, such as hierarchical data and multi-valued fields. However, starting with some basics allows us to step through most of the Migrate and Table Wizard screens and learn how they work. Hopefully this example has helped demonstrate the power of Migrate and Table Wizard modules, and you'll be able to add it as a critical tool for your next data import job.
Happy migrating! :)

