Welcome to the third part of our series on writing Views query plugins. In part 1, we talked about the planning work that should precede coding. In part 2, we covered the basics of actually writing a query plugin. In this final chapter, we will investigate some enhancements to make your plugin more polished and flexible.
Exposing configuration options
Allow Site Admins to set their preferred units: metric or imperial.
Most Fitbit endpoints accept an option to set the units the response is returned in. If you are Canadian like me, you know that metric is preferable, but it’s also in our nature to be nice, so we should expose a configuration option to allow our American friends to show data in their anachronistic imperial units. (I jest, love you guys!)
Exposing configuration options for a query plugin is done in two parts. First, build the UI and, second, make use of the stored configuration. In our query plugin class, we’ll implement two methods to help us create the UI, defineOptions and buildOptionsForm :
/**
 * {@inheritdoc}
 */
protected function defineOptions() {
  $options = parent::defineOptions();
  $options['accept_lang'] = array(
    'default' => NULL,
  );
  return $options;
}
/**
 * {@inheritdoc}
 */
public function buildOptionsForm(&$form, FormStateInterface $form_state) {
  parent::buildOptionsForm($form, $form_state);
  $form['accept_lang'] = [
    '#type' => 'select',
    '#options' => [
      '' => $this->t('Metric'),
      'en_US' => $this->t('US'),
      'en_GB' => $this->t('UK'),
    ],
    '#title' => $this->t('Unit system'),
    '#default_value' => $this->options['accept_lang'],
    '#description' => $this->t('Set the unit system to use for Fitbit API requests.'),
  ];
}
With this done, we should see our configuration options in the Views UI under Advanced > Query settings.
However, it won’t work because we’re not actually using the stored configuration yet. To do that, we’ll add to our execute method in our query plugin:
/**
 * {@inheritdoc}
 */
public function execute(ViewExecutable $view) {
  // Set the units according to the setting on the view.
  if (!empty($this->options['accept_lang'])) {
    $this->fitbitClient->setAcceptLang($this->options['accept_lang']);
  }
  // Clip...
}
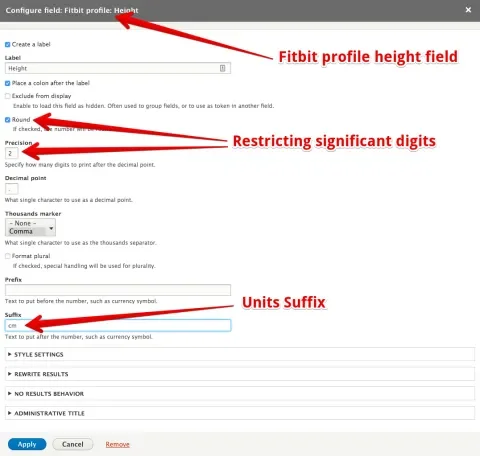
Query plugin options are available via $this->options, which Drupal provides as part of the QueryPluginBase class that our Views plugin is extending. We use the stored value, together with a method on the Fitbit client service to set the preferred units for all subsequent API requests: $this->fitbitClient->setAcceptLang($this->options['accept_lang']); With that, site administrators can set their preferred units, and the result set will reflect that choice. Since this is Views and we’ve exposed height as a numeric field, Views core gives us a nice way to format the data and suffix it with units so we end up with a polished result. Just edit the field options.
Field plugin options
Adding options to customize the appearance of the avatar field.
Views also allows us to have custom options for our field plugins. In the last article, we set up a field plugin for avatar which uses the avatar URI from the API response and renders it as an <img> tag. Fitbit’s API actually provides two avatar size options and it would be great to leave it to the site administrator to decide which size to render. We’ll use field plugin options to do that.
As with query plugins, exposing configuration options for a field plugin follows the same two parts, with one small addition. In our query plugin class, we’ll implement two methods, defineOptions and buildOptionsForm , to build the UI:
/**
 * {@inheritdoc}
 */
protected function defineOptions() {
  $options = parent::defineOptions();
  $options['avatar_size'] = ['default' => 'avatar'];
  return $options;
}
/**
 * {@inheritdoc}
 */
public function buildOptionsForm(&$form, FormStateInterface $form_state) {
  $form['avatar_size'] = [
    '#type' => 'select',
    '#title' => $this->t('Image size'),
    '#options' => [
      'avatar' => $this->t('Default (100px)'),
      'avatar150' => $this->t('Medium (150px)'),
    ],
    '#default_value' => $this->options['avatar_size'],
    '#description' => $this->t('Choose the size avatar you would like to use.'),
  ];
  parent::buildOptionsForm($form, $form_state);
}
This should be fairly self-explanatory; we’re defining a form element for the UI and, once saved, the configuration option will be stored in $this->options['avatar_size'] . The small addition I referred to earlier lies within the query plugin. Before, we were only passing along the single value for avatar. Now that the site administrator has the option, we’ll want to make sure both values for avatar are passed along in the Views result. We do that, in the query plugins execute method like so:
$row['avatar'] = [
  'avatar' => $data['avatar'],
  'avatar150' => $data['avatar150'],
];
Instead of a flat value, we’re setting ‘avatar’ to an array with both values for avatar from the API response. Then, back in the field plugin, in the render method, we take care to use the appropriate size avatar according to the option selected:
/**
 * {@inheritdoc}
 */
public function render(ResultRow $values) {
  $avatar = $this->getValue($values);
  if ($avatar) {
    return [
      '#theme' => 'image',
      '#uri' => $avatar[$this->options['avatar_size']],
      '#alt' => $this->t('Avatar'),
    ];
  }
}
We simply call $this->getValue($values) which is able to pull out the value we want from the ResultRow object. The render method receives a ResultRow object that has all of the data for the row. FieldPluginBase has a getValue method which we can access since we are extending FieldPluginBase . With that done, we can now click on the avatar field in the Views UI and set the desired image size:
Filter plugins
Filtering the leaderboard by user id.
What if we wanted to limit the result to only a particular user? Say we wanted to show a user's Fitbit details on their Drupal user profile page. For that, we’d need to filter the result set by a user id. To make that happen, we need a Views filter plugin. The first step is to define the field to filter on in hook_views_data():
/**
 * Implements hook_views_data().
 */
function fitbit_views_example_views_data() {
  // Base data and other field definitions...
  $data['fitbit_profile']['uid'] = [
    'title' => t('User id'),
    'help' => t('Drupal user id, not to be confused with Fitbit profile id.'),
    'field' => [
      'id' => 'standard',
    ],
    'filter' => [
      'id' => 'fitbit_uid',
    ],
  ];
  return $data;
}
The part we are most concerned with here is the ‘filter’ key. Its value is an associative array with one key ‘id’, which we set to the name of the filter plugin we’re going to create. Also, note the ‘field’ key, which makes the Drupal user ID available as a field in the Views UI. It doesn’t hurt to add it, and it also illustrates how plugins related to a certain field (e.g. field, filter, and others like relationship and argument) are all defined in the same array in hook_views_data(). So, for the next step, we’ll create this file: fitbit_views_example/src/Plugin/views/filter/Uid.php
<?php
namespace Drupal\fitbit_views_example\Plugin\views\filter;
/**
 * Simple filter to handle filtering Fitbit results by uid.
 * @ViewsFilter("fitbit_uid")
 */
class Uid extends FilterPluginBase {
}
So far, this is typical Drupal 8 plugin scaffolding code. The file is placed in the right folder for the plugin type. The namespace follows PSR-4 naming. The annotation for the plugin type assigns an id to our plugin. Finally, we extend the base class provided by Views for the plugin type. Now let’s look at the specifics required for our filter plugin implementation:
class Uid extends FilterPluginBase {
  public $no_operator = TRUE;
  /**
   * {@inheritdoc}
   */
  protected function valueForm(&$form, FormStateInterface $form_state) {
    $form['value'] = [
      '#type' => 'textfield',
      '#title' => $this->t('Value'),
      '#size' => 30,
      '#default_value' => $this->value,
    ];
  }
}
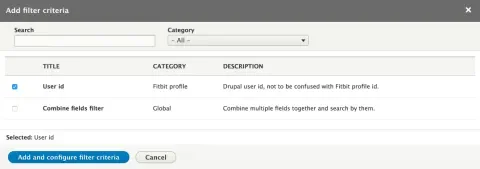
$no_operator = TRUE tells Views that we are not interested in the site administrators having an option to select an operator. In our case, we’ll keep things simple and always assume '='. You could, of course, allow for choice of operators if your remote service supports it. The key component here is the valueForm method. In it, we need to set an appropriate Form API element for the ‘value’ key of the $form array passed as the first argument. The name ‘value’ is important as the base class expects this key to work. The form element that you return is used in a couple of places. It’s used in the Views UI for when the site administrator is setting up a filter. It’s also used if the filter is exposed, rendered in the exposed filters form with the view itself. That’s it for the plugin implementation. At this point we can add the filter in the Views UI:
The last step adjusts our query plugin to be able to handle and make use of the filter. The first thing we’ll need to do is implement an addWhere method on the query plugin class:
public function addWhere($group, $field, $value = NULL, $operator = NULL) {
  // Ensure all variants of 0 are actually 0. Thus '', 0 and NULL are all
  // the default group.
  if (empty($group)) {
    $group = 0;
  }
  // Check for a group.
  if (!isset($this->where[$group])) {
    $this->setWhereGroup('AND', $group);
  }
  $this->where[$group]['conditions'][] = [
    'field' => $field,
    'value' => $value,
    'operator' => $operator,
  ];
}
Here, especially, we can see Views’ biases to SQL rear its head. The method name, addWhere, is odd from our perspective of querying a remote service. There is no notion of a WHERE clause present in the Fitbit API. Further, Views supports grouping filters and logical operators within each group. Here again, the remote service we are using has no notion of this. It’s possible the remote service your implementing does in which case the flexibility Views affords is amazing. In our case it’s overkill, but I’ve copied core Views implementation for the SQL query plugin, so we’ll be able to handle everything that the Views UI allows for setting up filters. The final step is adjusting the execute method on our query plugin to incorporate the filter into the call to the Fitbit API:
/**
 * {@inheritdoc}
 */
public function execute(ViewExecutable $view) {
  // Clip ...
  if (isset($this->where)) {
    foreach ($this->where as $where_group => $where) {
      foreach ($where['conditions'] as $condition) {
        // Remove dot from beginning of the string.
        $field_name = ltrim($condition['field'], '.');
        $filters[$field_name] = $condition['value'];
      }
    }
  }
  // We currently only support uid, ignore any other filters that may be
  // configured.
  $uid = isset($filters['uid']) ? $filters['uid'] : NULL;
  if ($access_tokens = $this->fitbitAccessTokenManager->loadMultipleAccessToken([$uid])) {
    // Query remote API and return results ...
  }
}
Here, we’re looping through any filters that have been configured on the view and grabbing their values. We then ignore any other filter that may have been configured on the view, since we’re only supporting uid for now and pass it along to which$this->fitbitAccessTokenManager->loadMultipleAccessToken([$uid]), will limit the access tokens we get back to just the uid set and only show us results for the corresponding user.
Often, as was the case on a recent client project, the filters that you set up will actually get passed along in the remote API request. The Fitbit API is a bit odd in this regard in that most endpoints only return data for a single user anyway, so there is no filtering that makes sense.
That’s it! After all that work, we can set up a filter by uid to limit the results to a single user.
Wrap up
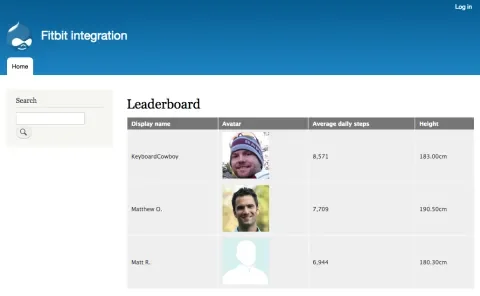
We did it, at long last, we’ve produced a custom Fitbit leaderboard, which might look something like this:
Of course this is just stock Drupal 8 with the Fitbit module installed and configured, but it is Views and we all know how to customize the look and feel of Views, so make it pretty to your heart's content.
While we've looked at a lot of code, I don't think that any of it has been horribly complicated. It's mostly a matter of knowing what to put where with a healthy dose of planning to make sure our data fits into the Views paradigm properly. In summary, the steps are:
-
Make a plan of attack, taking into account the data you're retrieving and the way Views expects to use it.
-
Create field handlers for your data as necessary.
-
Write remote queries to retrieve your data and store it in rows in the view object.
-
Write filter plugins as necessary to narrow the result set.
There's a lot of work in those steps, but after running through it a couple times the architecture makes a lot of sense.
Get the code!
The code from this article can be found in the Fitbit module on drupal.org. It consists of a base module to handle application setup, authentication and access token storage and two sub-modules for Views integration. The first is fitbit_views_example, which I created specifically for this article series. You’ll find all the code we went through in there. The other one, fitbit_views is a more fully featured and slightly more complex version, including spanning multiple API endpoints with relationship plugins. You should use fitbit_views if you're intending on using this functionality on your Drupal site. Feel free to file issues and patches!
Phew, that was a lot. Thanks for sticking with me through it all. Special thanks to Greg Dunlap for trusting me with the reboot of his original series, which has guided me through my own Views query plugin implementations. Thanks also to the Fitbit module maintainer, Matt Klein, who was kind enough to grant me co-maintainer rights on the project.


