The previous article of this series provided an overview of setting up a GitHub Actions workflow that would publish changes into a Kubernetes cluster. This article takes you through each of the steps of such a workflow.
For reference, here is the GitHub Actions workflow in the sample repository at .github/workflows/ci.yml:
on:
  push:
    branches:
      - master
name: Build and deploy
jobs:
  build:
    runs-on: ubuntu-latest
    steps:
      - uses: actions/checkout@v1
        with:
          fetch-depth: 1

      - name: Build, push, and verify image
        run: |
          echo ${{ secrets.PACKAGES_TOKEN }} | docker login docker.pkg.github.com -u juampynr --password-stdin
          docker build --tag docker.pkg.github.com/juampynr/drupal8-do/app:${GITHUB_SHA} .
          docker push docker.pkg.github.com/juampynr/drupal8-do/app:${GITHUB_SHA}
          docker pull docker.pkg.github.com/juampynr/drupal8-do/app:${GITHUB_SHA}
      - name: Install doctl
        uses: digitalocean/action-doctl@v2
        with:
          token: ${{ secrets.DIGITALOCEAN_ACCESS_TOKEN }}

      - name: Save cluster configuration
        run: doctl kubernetes cluster kubeconfig save drupster

      - name: Deploy to DigitalOcean
        run: |
          sed -i 's|<IMAGE>|docker.pkg.github.com/juampynr/drupal8-do/app:'${GITHUB_SHA}'|' $GITHUB_WORKSPACE/definitions/drupal-deployment.yaml
          kubectl apply -k definitions
          kubectl rollout status deployment/drupal
      - name: Update database
        run: |
          POD_NAME=$(kubectl get pods -l tier=frontend -o=jsonpath='{.items[0].metadata.name}')
          kubectl exec $POD_NAME -c drupal -- vendor/bin/robo project:files-configure
          kubectl exec $POD_NAME -c drupal -- vendor/bin/robo project:database-update
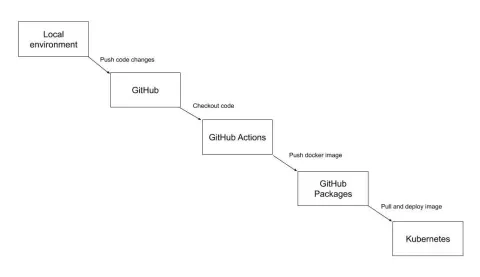
There are several systems involved in the above workflow. Here is a diagram that illustrates what is happening:
Building an image
The first step at the GitHub Actions workflow builds a Docker image containing the operating system and the application code, along with its dependencies and libraries. Here is the GitHub Actions step:
 - name: Build, push, and verify image
  run: |
    echo ${{ secrets.PACKAGES_TOKEN }} | docker login docker.pkg.github.com -u juampynr --password-stdin
    docker build --tag docker.pkg.github.com/juampynr/drupal8-do/app:${GITHUB_SHA} .
    docker push docker.pkg.github.com/juampynr/drupal8-do/app:${GITHUB_SHA}
    docker pull docker.pkg.github.com/juampynr/drupal8-do/app:${GITHUB_SHA}
The Docker images are named with the Git commit hash via the environment variable {GITHUB_SHA}. This way, you can match deployments with commits in case you need to review or roll back a failed deployment. We also created a personal access token to authenticate against GitHub Packages and saved it as a GitHub Secret as PACKAGES_TOKEN.
The Dockerfile that docker build uses for building the Docker image is quite simple:
FROM juampynr/drupal8ci:latest
COPY . /var/www/html/
RUN robo project:build
The base image is juampynr/drupal8ci. This image is an extension of the official Drupal Docker image, which extends from the official PHP Docker image with an Apache web server built in. It has a few additions like Composer and Robo. In a real project, you would use Ubuntu or Alpine as your base image and define all the libraries that your application needs.
The last command at the above Dockerfile, robo project:build, is a Robo task. Robo is a PHP task runner used by Drush among others. Here is the output of running this task in a GitHub Actions run:
Step 3/3 : RUN robo project:build
199 ---> Running in 2b550db4d25e
200 [Filesystem\FilesystemStack] _copy [".github/config/settings.local.php","web/sites/default/settings.local.php",true]
201 [Composer\Validate] Validating composer.json: /usr/local/bin/composer validate --no-check-publish
202 [Composer\Validate] Running /usr/local/bin/composer validate --no-check-publish
203./composer.json is valid
204 [Composer\Validate] Done in 0.225s
205 [Composer\Install] Installing Packages: /usr/local/bin/composer install --optimize-autoloader --no-interaction
206 [Composer\Install] Running /usr/local/bin/composer install --optimize-autoloader --no-interaction
207Loading composer repositories with package information
208Installing dependencies (including require-dev) from lock file
In essence, robo project:build copies a configuration file and downloads dependencies via Composer.
The result of the docker build command is a Docker image that needs to be published somewhere the Kubernetes cluster can pull it during deployments. In this case, we are using GitHub Packages to host Docker images.
Connecting GitHub Actions with the Kubernetes cluster
At this point, we have built a Docker image with our application containing the latest changes. To deploy such an image to our Kubernetes cluster, we need to authenticate against it. DigitalOcean has a Kubernetes action that makes this easy via doctl, its command-line interface.
- name: Install doctl
  uses: digitalocean/action-doctl@v2
  with:
    token: ${{ secrets.DIGITALOCEAN_ACCESS_TOKEN }}

- name: Save cluster configuration
  run: doctl kubernetes cluster kubeconfig save drupster
The first step uses DigitalOcean’s GitHub action to install doctl while the second one downloads and saves the cluster configuration, named drupster.
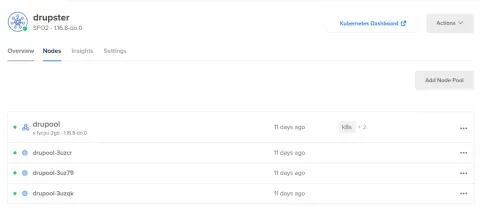
As for the DigitalOcean setup, there is nothing fancy about it. You can just sign up for a Kubernetes cluster which uses three nodes (aka Droplets in DigitalOcean’s lingo):
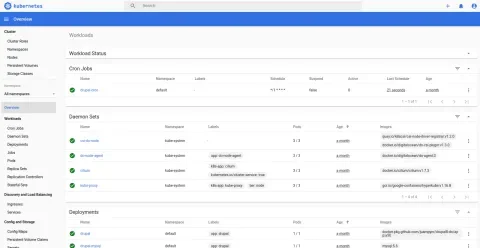
The Kubernetes Dashboard link at the top right corner takes you to a page that shows an overview of the cluster:
The above dashboard is a great place to monitor deployments and look for errors. Speaking of deployments, this is what the next section covers.
Deploying the image into the cluster
Here is the step that deploys the Docker image to DigitalOcean:
- name: Deploy to DigitalOcean
  run: |
    sed -i 's|<IMAGE>|docker.pkg.github.com/juampynr/drupal8-do/app:'${GITHUB_SHA}'|' $GITHUB_WORKSPACE/definitions/drupal-deployment.yaml
    kubectl apply -k definitions
    kubectl rollout status deployment/drupal
The first line fills a placeholder <IMAGE> with the image being deployed, which came from the commit hash. The next two lines perform the deployment and verify its status.
Note: We will inspect each of the Kubernetes objects in the next article of this series, but if you are curious, you can find them here.
After the deployment is triggered, the Kubernetes master node will destroy the pods and create new ones containing the new configuration and code. This process is called rollout, and it may take a variable time depending on the scale of the deployment. In this case, it took around 20 seconds.
If something goes wrong while pods are being recreated, there is the chance to undo the changes by rolling back to a previous deployment configuration via kubectl rollout undo deployment/drupal.
Updating the database
If the deployment succeeded, then the next step is to import configuration changes and run database updates. An additional command was added to ensure that file permissions are correct due to issues found while setting up the workflow). Here is the step:
- name: Update database
  run: |
    kubectl exec deployment/drupal -- vendor/bin/robo project:files-configure
    kubectl exec deployment/drupal -- vendor/bin/robo project:database-update
The above step completes the workflow.
Next in this series…
The next and last article in this series will cover each of the Kubernetes objects in detail.
Acknowledgments
- Inspiring articles written by Alejandro Moreno and Jeff Geerling
- Tutorials that helped create a mental map of how to fit each of the pieces together in the puzzle:
- This stellar presentation by Tess (socketwench)
- Andrew Berry and Salvador Molina Moreno for their technical reviews
If you have any tips, feedback, or want to share anything about this topic, please post it as a comment here or via social networks. Thanks in advance!


